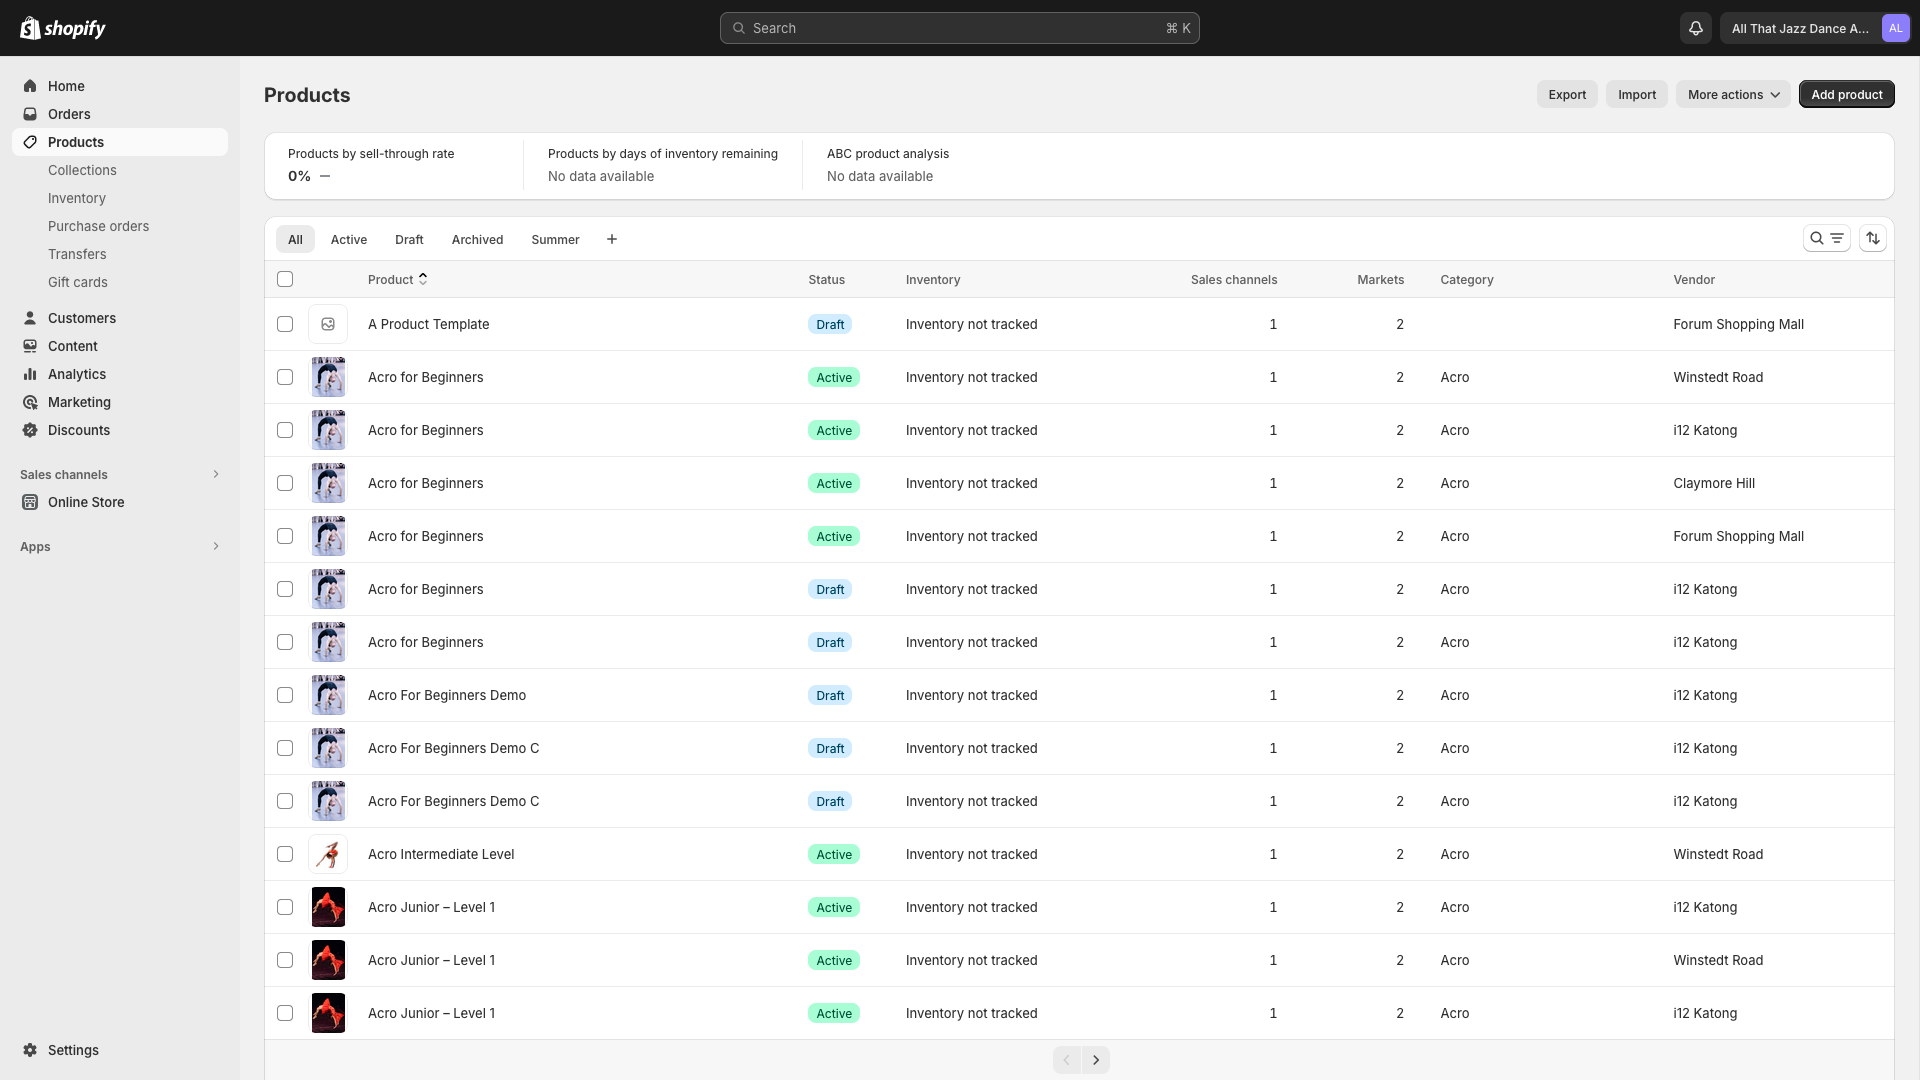
Upon signing into your Shopify Admin account, you will be presented with the Products page. This page serves as the central location where you can view and manage all of your classes.
Each class is represented as an individual product listing. Within these product pages, you have the ability to configure various details, including the class type, location, and other relevant information.
On the Products page, let's start by using the template product titled "A Product Template." Click to open this template, then navigate to the top and click "Duplicate," followed by "Duplicate Product" on the pop-up.
You've now duplicated the product template. Next, you can provide a new Title and Description for your product.
To add a product thumbnail image, locate the Media section and click "Add Files." Select the desired image file from your computer and open it.
To ensure the thumbnail appears correctly on your Shopify storefront, you'll need to add the image as a Variant. Navigate to the Variants section, click on the image you just uploaded, and click "Done." Then, click "Edit" under Option Values and add the Location for the variant.
Under the Product Organization section, you can specify the Product Type, for example, "Acro." You can also set the Vendor, such as "i12 Katong." Lastly, for Tags, select the option "trial_class." Note: Do not remove the tag "wk_booking."
This section allows you to add crucial information like Times of Day, Suitable Ages, and Days of the Week for your class. To add Times, click the field and select an option from the drop-down list of available class times. Click "Add item" to include additional times. If you don't find the desired time, refer to the documentation section on Adding Timeslots.
For Ages, the options range from 1 to 17 and 18+. If you're offering a class for ages 7 and up, select options from 7 to 17, followed by 18+. Similarly, for Days, select from the available options and click "Add item" if necessary.
Once you've completed the product details, you can publish your class by changing the Status from "Draft" to "Active." Alternatively, click "Save" and then "Preview" to see how your product will appear on the Shopify storefront before publishing.
Adding a Camp Class is quite similar to adding a Trial Class. Let's begin from the Product Page. Duplicate an existing template or product by clicking "Duplicate" followed by "Duplicate Product" on the pop-up.
When duplicating, you will have the option to keep the same thumbnail image. In this case, we will add our own thumbnail. Navigate to the Media section and click "Add Files" to upload a new image.
Next, let's move to the Meta Fields. We will keep most of the settings the same, except for the Tags. Here, change the tag from "trial_class" to "dance_camp."
Now, let's adjust the Times, Ages, and Days for our Camp Class. Under Times, select the options from 9:00 AM to 11:30 AM and 12:00 PM to 2:30 PM. For Ages, choose the range from 7 to 10 years old. As for Days, since the camp is happening throughout the week, select Monday through Friday.
Once you have completed these changes, click "Save" to finalize the Camp Class product.
When setting up class times on your product page, you might find that your desired timeslot isn't available. First, navigate to the bottom of the right panel on your Shopify dashboard and open "Settings".
Once you're in Settings, look for the "Custom Data" option, then proceed to click on "Products." Here, you're looking for "Times" under the "Definitions" section. This is where all current timeslots are listed. To add your new timeslot, scroll to the bottom of the list and click on "Add Item." Enter the time you wish to add, for example, from 2:15 PM to 3:00 PM.
After entering your new timeslot, you might want to keep your list organized. You can do this by clicking and holding the six dots to the left of your new entry, then dragging it to the desired position in the list. Once you're satisfied with the arrangement, click "Save" to apply your changes, then close the settings.
Finally, refresh your product page on the Shopify dashboard. You should now see the new timeslot available for selection.
The Bulk Edit feature on the products page allows you to make widespread changes with just a few clicks.
On the products page, select the products you wish to edit by checking the boxes next to each one. With your products selected, look towards the top of the table and click on 'Bulk Edit.' This action will bring up a menu showcasing various product variables that can be edited en masse, including Status and Location.
Should you require to adjust a variable not immediately visible, simply click on 'Columns' located at the top right corner of the interface. Here, you can select additional fields that you might need to edit, such as Times, Ages, Day, and more.
For making your selection, click while holding the Control key (or Command key on Mac OS) for individual selections. If you need to select a range of products, hold the Shift key instead, and click to define the start and end points of your selection. Then, any edit you make to one of the fields for a product will automatically apply to all selected products.
After you've made the necessary changes, don't forget to click 'Save' to confirm and apply these changes across your selection.
Webkul enables users to submit their information and book classes through a dedicated form on the product page of your Shopify store. To facilitate this functionality, each product listing needs to be linked to Webkul, with the respective class information entered accurately. This integration allows users to book available class times on the specified days.
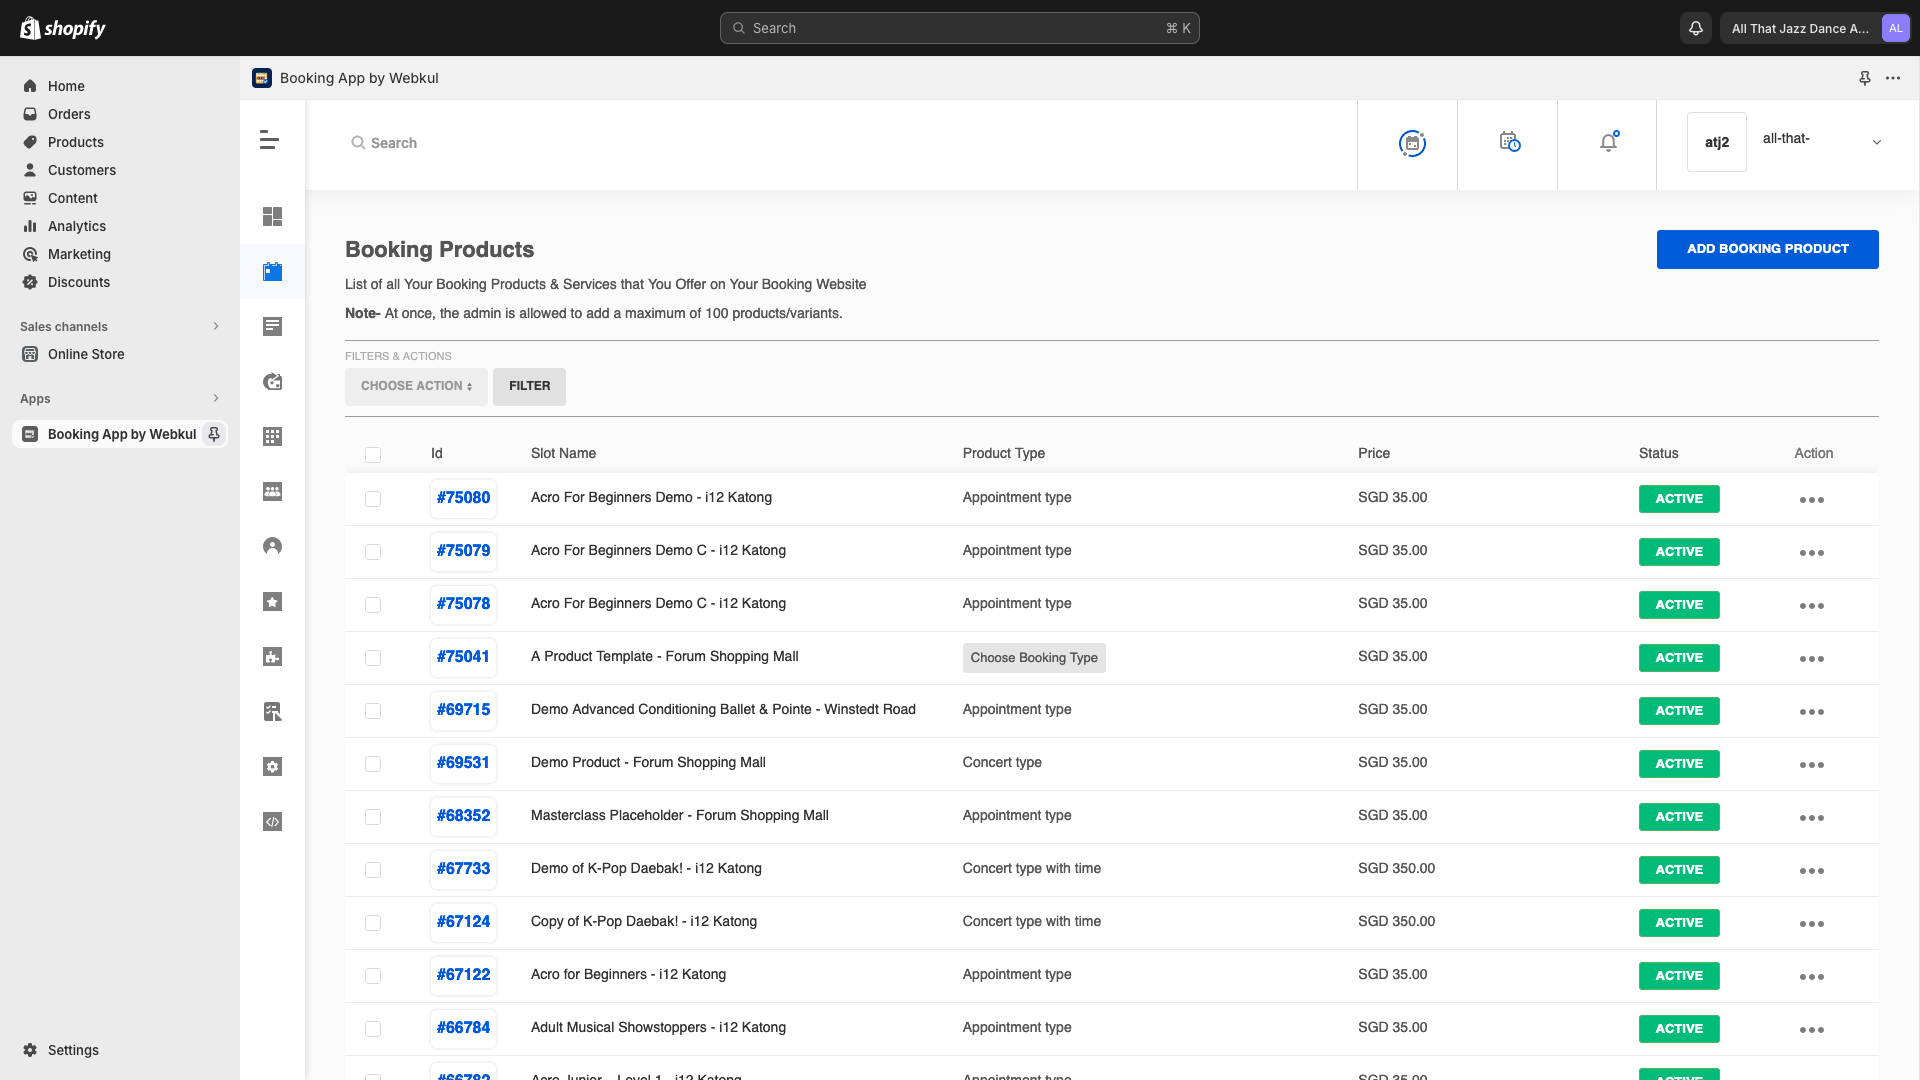
The Webkul dashboard provides an overview of the products that have already been connected to the Webkul system.
To make edits to a product from the Webkul panel, click on the three-dot menu on the right side of the product listing, and then select "Edit Booking Product." Alternatively, you can navigate to the specific Webkul product by clicking "More Actions" and then selecting "Booking Product" from the dropdown menu on the product editor page within Shopify.
From the Webkul product editor, you can modify various settings, such as class times, availability, and booking limits, ensuring that your class offerings are accurately represented and up-to-date for customers.
To add a trial class, start from the page of the product you've just created. On the top navigation, click "More Actions," and then select "Booking Product" from the dropdown. This will link the product you've created to Webkul.
Now that your product is linked to Webkul, under the Booking Type section, select "Multi User Booking."
On the newly created Multi User tab, set the Guests/Customer Limit to your desired number, for example, 10.
Next, navigate to the Location tab and under Service Side, select "Not Required."
For availability, select "Appointment Type" as the type of booking product. Then, select the Days of the week your class takes place, such as Mondays and Fridays.
For Slot Type, switch to the Advance tab. Here, you can add the time of your class for the selected days. For instance, if your class is from 12:00 PM to 12:45 PM on Mondays and 1:15 PM to 2:00 PM on Fridays.
Under Slot Type, select "From" and click the up or down arrows to set the desired start time. Then, select "To" and repeat the process to set the end time. Click "Add" to include this time slot for your class.
Repeat this process for additional class times on the selected days.
Next, ensure the Booking Timing is consistent with the duration of your classes. Then, set the Rest Time After Per Booking Slot to 0 Minutes.
Once you've completed these steps, click "Save" to confirm the changes on Webkul.
Adding a Camp Class into Webkul is relatively similar to adding a Trial Class. However, there is a key difference in the Availability settings.
Instead of selecting "Appointment Type," for a Camp Class, you will choose "Concert Type" under Availability.
The "Concert Type" option allows you to set the start and end dates for the camp. First, select the start date as the first day of the camp. Then, choose the end date as the last day of the camp.
After setting the start and end dates, click "Add" to include the selected range of days as a camp session.
Once you have completed these steps for the Availability settings, you can proceed to click "Save" to finalize the Camp Class product in Webkul.
To create a form to collect information, start by opening your product within Webkul and proceed to the Custom Fields section. This area enables you to craft various fields for your form to capture the specific details you need from your users.
For concise, single-line responses, such as parent’s details, use the "Text" field.
When you need users to provide more extensive information, like participants' dance backgrounds, opt for the "Textarea" field, which allows for multiple lines of input.
The "Choice" field is perfect for scenarios where users must select one or more options, whereas the "Select" field suits situations where users choose from a dropdown list of options.
After adding the desired fields to your form, remember to save your changes.
For an efficient way to handle form fields across multiple products in Webkul, you can leverage the bulk Custom Fields adding feature.
Start by accessing the Webkul dashboard. Here, select the products to which you intend to add the form fields. Following this selection, navigate to "Choose Action" and from the subsequent drop-down menu, select "Add Custom Fields".
This action mirrors the process of adding a regular Custom Field, allowing you to incorporate the necessary fields en masse.
After configuring the custom fields as needed, make sure to click on save.